Blogging is a great way to share ideas, thoughts, and experiences. Not only is it an effective way to communicate. But it can also be a lucrative way to make money. In Bangladesh, blogging has gained a lot of popularity in recent years. You should follow a few key steps to start a blog that makes money in 2023. Pack your bags and start a blogging journey today!
Step 1: Choose A Niche for Your Blog
You have to choose a niche before you start a blog. Niche is an essential part of any kind of content. So, What’s the Niche? Niche is a specific topic or area that your blog will focus on. Some popular niches for blogs in Bangladesh include technology, lifestyle, travel, food, and fashion. Choosing a niche you’re passionate about and knowledgeable about is essential.
Step 2: Choose a Blogging Platform
You’ve chosen your niche, right? Now you have to choose a blogging platform. There are many different platforms available. But WordPress, Blogger, and Wix are the most popular blogger platforms. Individually platform has pros and cons, so it’s essential to research them thoroughly before deciding.
WordPress
WordPress is the most popular platform for bloggers because it’s easy to use and offers many customization options. Blogger is also a good choice for beginners because it’s free and easy to set up. Wix is a website builder that offers blogging as one of its features. It’s a good choice for those who want to create a website and blog all in one place. Approximately 43.1% of all websites use WordPress, according to W3Techs.
Step 3: Choose a Domain Name and Hosting
A Domain name and web hosting are mandatory to start your blog in the long run. You can choose a free domain name and web hosting if you don’t want to spend money. It could be for writing, not building a brand value later. So the decision is yours. I’ll guide you both.
I hope you want to start a blog in the long run. You can build your blog like a brand in the future. So paid option is the best choice for you. All successful bloggers have paid domain names and paid hosting.
So did you decide to buy a paid domain name and web hosting? Then follow my instructions. I’ll guide you on buying paid domain names and web hosting.
I. Goto namecheap.com and type a domain name
Go to namecheap.com, and you will see something like this image. You just have to type a domain name for your new blog. For example, I’ve typed in mynewblog.com
Oh, man! As you can see, this is a premium domain name, so I have to choose another domain name either. I have to pay a lot to buy this premium domain. I searched for another domain name for my blog. This time I searched for alimblog.com, and it’s available to purchase.
So if this situation happens to you, try to search again for another domain name and press the Add to Cart button.
After that, a Checkout button will be shown at the bottom of the page or screen, as seen in this image. Just press the Checkout button to continue to the other steps.
II. Review your domain order and add WordPress Hosting to the cart
III. Confirm the Order
IV. Login or Signup for your Namecheap account
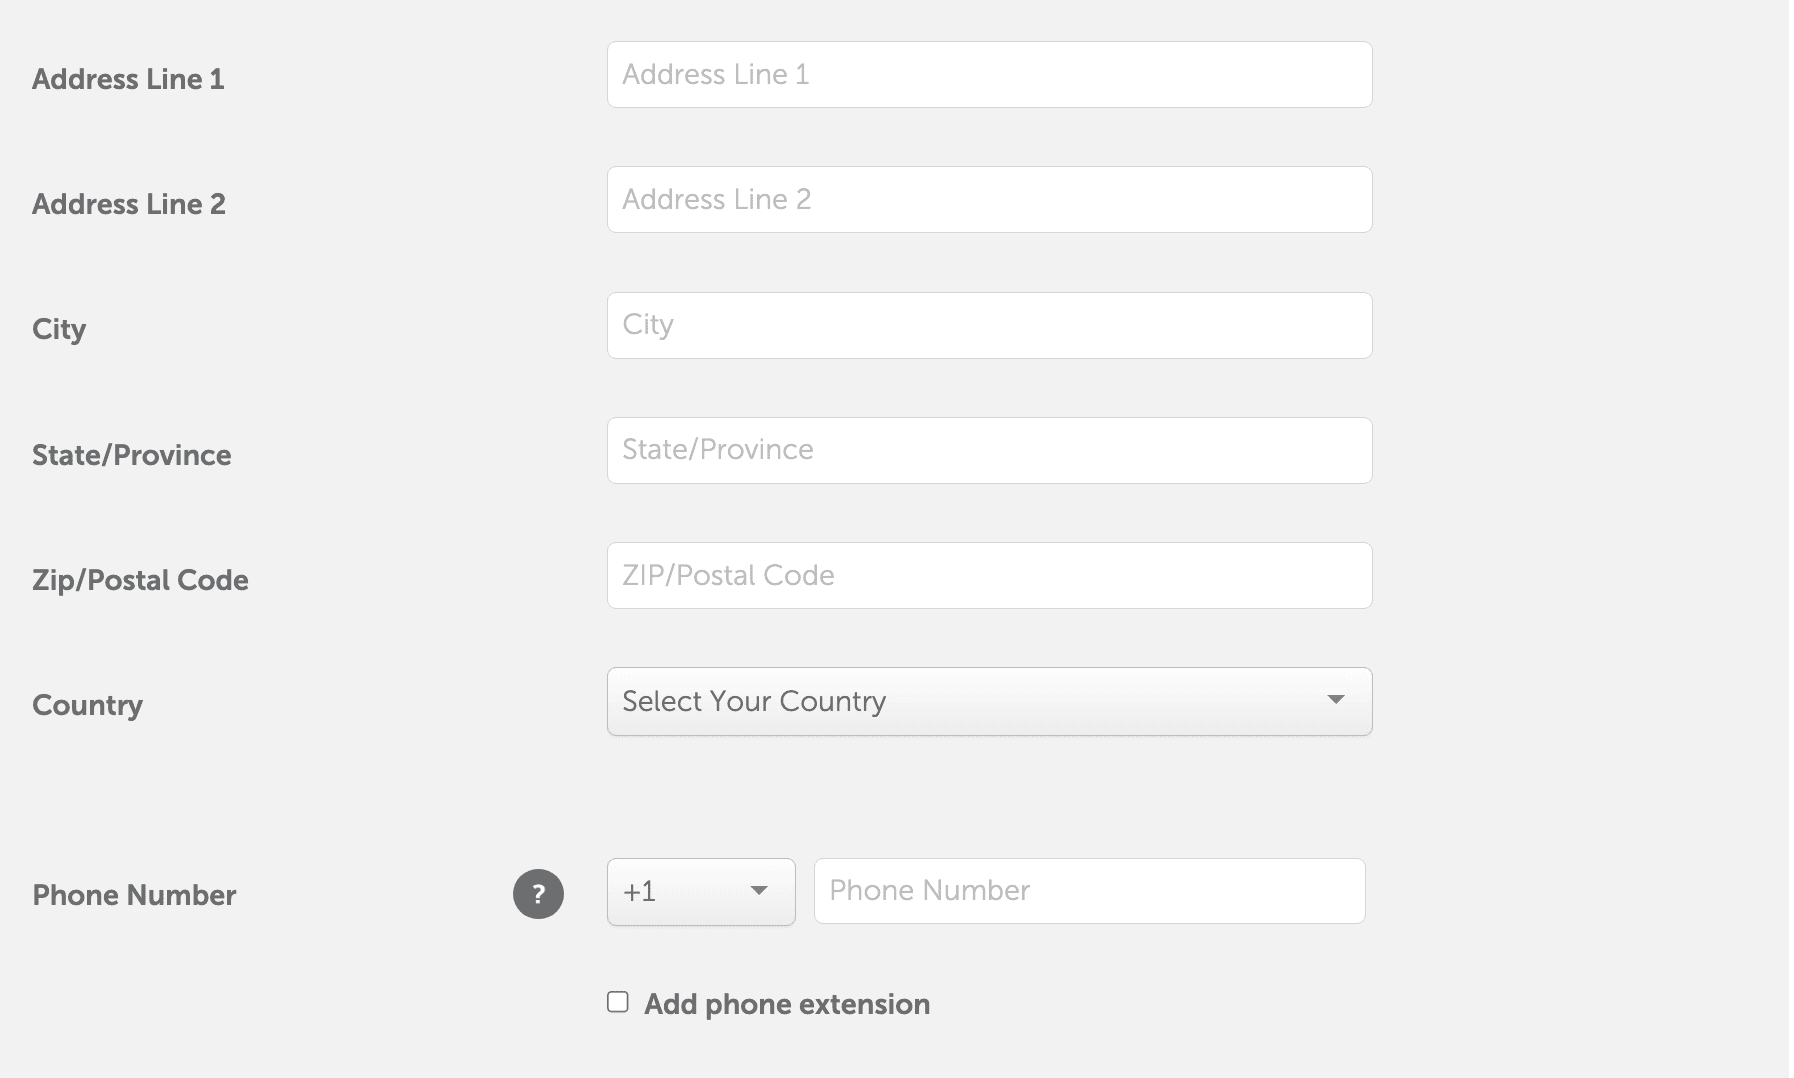
V. Fill in Account Contact Information
After that, all of your filled-in information will be shown to you as a preview, and press the Continue button again.
VI. Select Payment Method to Pay
Done! You have purchased a new domain name and WordPress hosting for your new blog.
Step 4: Setup your blog on EasyWP (Optional)
After you purchase EasyWP WordPress hosting, you should go through these additional steps to set up your new blog on EasyWP. No need to worry. I’m here to guide you.
I: Enter the name of your new blog
II: Choose a domain for your blog
III: Pick a WordPress theme
IV: Choose essential plugins
Choose essential plugins for your new blog and press the Continue button. I suggest you choose Yoast SEO and Site Kit by Google Plugins. Those two plugins will help to improve SEO and drive more organic traffic to your blog.
V: Review details
Please review the information regarding your new blog setup. Press the Continue button to create your blog if all data is correct.
You can always go back and update your information and selections.
V: Test your new blog
Step 5: Customize Your Blog
You already have access to the WP Admin of your new blog. Now let’s customize your blog and give it an excellent modern look.
I: Install the Astra theme
Select the Themes option under the Appearance section on the left navigation bar to add the new theme. Here you will see all the themes already installed on your site.
But, the Astra theme was not installed by default. We have to do it manually.
But, the Astra theme was not installed by default. We have to do it manually. Click the Add New button on the top and type Astra on the search box from the top right side of the page.
Once you find it hovers over it, press the Install and Activate buttons.
II: Install the Starter Templates plugin

You will see the Astra theme activated on your site. It also shows a message telling you to install the Starter Templates plugin to get started.
Press the Get Started button, and it will install the Starter Templates plugin for you.
NOTE: You can manually install the Astra Starter Sites plugin if you don’t see that message. All you need to do is Select the Add New option under the Plugins section on the left navigation bar. Then type Astra Starter Sites on the search box from the top right side of the page. Once you find it hovers over it, press the Install and Activate buttons.
III: Select Page Builder
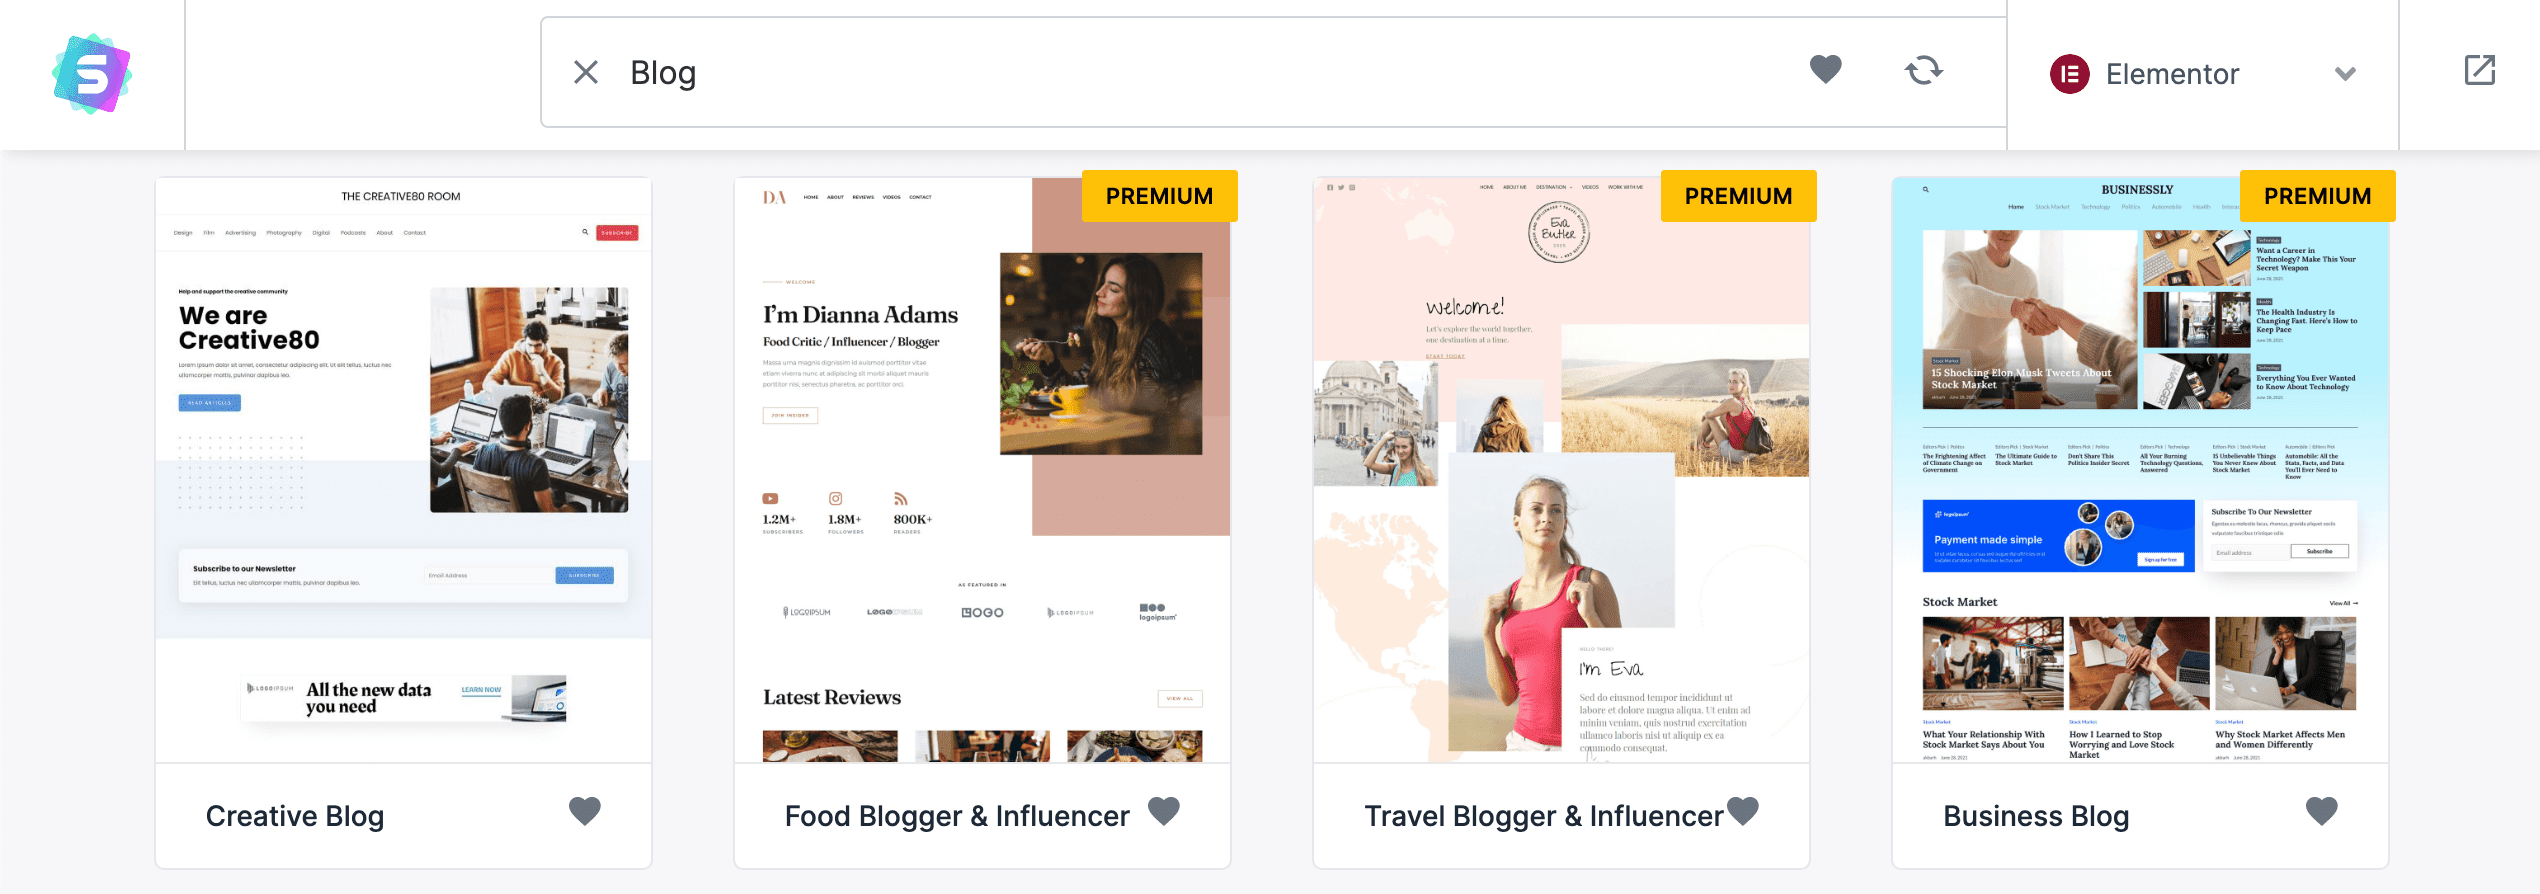
Then select Page Builder. Choose Elementor. Then it will show your site’s free templates.
IV: Select Creative Blog Template
V: Upload the logo and save the template
It will take some times to import dummy contents, widgets, and settings. After a few seconds, you’ll see Congratulations! Your website is ready! You can view your site now.
Check Out Astra Pro for Premium Features
I just built my website in 24 seconds with Starter Templates by @CyberAlim. Can’t believe how easy it is! 😍
CLICK TO TWEET
Step 6: Create High-Quality Content
Every successful blog has a strong backbone called high-quality content. Remember earlier. We discussed choosing a niche for your blog. Just write high-quality content while keeping your niche in mind. You should post new content regularly, such as once a week or monthly.
Step 7: Promote Your Blog
Have you published high-quality content on your blog? Start promoting your blog to attract readers and build an audience base. Without readers or audiences, your high-quality content is nothing. You have to attract audiences and hook them on your blog with the help of high-quality content.
Step 8: Monetize Your Blog
It may sound odd, but every blogger starts blogging with a dream that one day, he/she will monetize his/her blog and make a lot of money. Monetizing your blog is earning money using different strategies to generate revenue. There are lots of ways to monetize a blog. Here are some of the most common methods:
I. Showing Ads on Your Blog
Showing ads on your blog is a widespread and traditional way to monetize your blog. It’s straightforward to start showing as on your blog. Suppose you have published high-quality blog posts and have enough traffic on your site. That’s enough to register and apply to ad networks like Google Adsense, Ezoic, Media.net, and PropellerAds.
II. Affiliate Marketing
Affiliate marketing is a method to promote other people’s products or services on your blog and earn a commission for each sale made through your unique affiliate link. If your blog niche is product reviews, you should monetize your blog through affiliate marketing.
III. Selling Digital Products
If you have expertise in digital goods and services, then you should offer those goods or services through your blog. It is effective when your blog content relates to your products or services. For example, if your blog is about money management tips, you can offer an entire course on money management.
IX. Offering Services
Suppose you offer services related to your blog niche. You can use your blog to promote and sell those services. It could be any service, whether it’s online service or offline.
For example, Mr. Kabir is a full-stack web developer with a blog about website design and development. Then he can offer web development services to his blog.
Another example is Mrs. Aysha, a chef who runs a blog sharing food recipes. So she can easily offer personal chef services whether her fans will love to hire her for their events.
Step 9: Monitor the progress of your blog
Monitor the progress of your blog to identify areas where you can improve and make any necessary adjustments to ensure your blog continues growing and thriving.
It is essential to monitor your blog comments and engagement with your readers. Always try to respond to comments, especially for the first 24 hours after publishing a new blog post. This will help to interact with your audience and build a relationship.
Many website monitoring and analysis tools are available to help you observe your blog performance. For example, Google Analytics can provide valuable insights into your blog traffic, user behavior, and engagement.
Review all of those on Google Analytics for free. I recommend you spend some time on it and determine valuable insights from your blog. Find out most blog posts and the traffic sources. Also, determine how much time your readers spend on your blog and for what.
Your main goal is to hook the audiences on your blog for as long as possible. Try to share eye-catching graphics and videos on your blog post. This will help you hook your audiences on your blog for a long time.
Conclusion
Starting a blog doesn’t mean it will make billions of dollars for you. You have to be a more creative and unique, stylish writer. Remember that quality post is more important than many blog posts. Always try to insert visually appealing infographics in your blog posts.
 Reviewed by Abdul Alim
on
March 22, 2023
Rating:


No comments: